Monday, 25 November 2019

How I grow my Passion Fruit.


There are so many varieties of Passion fruit. 
The picture above is of the Passiflora edulis variety. 
It's a vine plant native to Southern Brazil through Paraguay and Northern Argentina.
The most popular are the yellow and red/purple ones.
The yellow variety has more vigorous vine and the fruits are larger than the red/purple ones.
 The pulps of yellow variety are more acidic and tangy, while the red/purple ones taste sweeter and richer in flavour and aroma. 

Pulps from ripen fruits are best in making drinks, dessert or salad๐Ÿ˜‹

On the 9th January 2019, a friend gave me a plant of passion fruit. It was about 3 feet tall and ready to climb. I have never seen a passion fruit nor tasted it before. As I never refuse a good offer from this particular friend, for she never plants any rubbish or useless plants. What i mean is what ever she has planted, they are all useful and fruitful.

9.1.19 - launched passion fruit plant -a gift from a friend

20.2.2019 A month later , plants growing more leaves and start to spread its vines to left and right

 
28.7.19 -About 6 months after planting the vines became prolific

15.8.2019 - Flower buds started to appear
Passion fruit buds transforming into beautiful fragrant flowers 

16.8.2019
The leaves and vines spread profusely from  only 1 plant, making ideal little shades in the garden
More trellis was added to let the vines spread further. The shade used to be the tiny chicken coop before. I removed the roof and platform allowing the vines and leaves to give shade like a roof on the  chicken coop.
On 19.10.2019  about 10 months  after the plant was transplanted to the ground, the flowers bloom like crazy and fruiting was prolific. About 3-8 flowers a day. 
It's lovely to see the shiny green fruits dangling on the trellis like ornaments.๐Ÿ˜‚ 
After reading from some blogs and watching U tube showing how fruits develop better by hand pollinating than those being pollinated by the bees butterflies or ants etc, I began to practice this method.


Short video of how I hand pollinate with a paint brush by collecting the pollen from one of the 5 Anthers (pollen pads) and brush lightly against all 3 stigma (female organ of the plant).
hand pollinate using paint brush : The flowers has 5 Anthers (pollen pads) as shown in the picture which has pollens on each pads. The 3 stigmas can be seen clearly on this pictures

Then brush slightly against the 3 stigmas where the pollen will stick to it and had the flowers fertilised to form fruits. The flowers will normally stay open in the early evening for 12 hours before they closes again with or without fertilisation.


This photo shows after fertilisation process.
 The flowers will close and the little bud inside each flower turned to a fruit.

25.11.2019 - Successful fertilisation lead to more than 120 fruits from my 1st plant.


12.12.2019 - there were more than a 100 fruits at this time, dangling on the trellis from one parent plant๐Ÿ˜

18th December 2019- The 1st fruit had ripen and dropped to the ground๐Ÿ˜‚.  When these happens, it's  time to harvest them๐Ÿ˜‚. The slightly wrinkled fruits are best to taste at this time, rather than the smooth shiny ones because they are absolutely ripe ones, juicy and sweeter. But I couldn't wait and curious to see what's inside the fruit as this is the first time I had my own passion fruit. So I cut it and the picture below is the result.

 
It was very fragrant and juicy and has a very delicious sweet tangy taste. I love it๐Ÿ˜‹๐Ÿ˜

 I made juice with it, by adding a teaspoonful of honey, a slice of lemon and water. That's all!


There were also a lot of flowers that didn't make it. 
Probably due to unfertilised flowers caused by heavy rainfall (Heavy rain can wash away pollens from the Anthers) or not enough pollinators around to pollinate them.  Some did develop to fruits, but half way through they just shriveled and dropped off, before maturing. For that, I don't know why.
1 bud of passion fruit flower

The flower sitting in a glass of hot water
Passion fruit flower Tea 
I added 1/4 Teaspoon of brown sugar, some preferred to go without. 
It seemed to help in relaxing and aid mild insomnia. I drank this in the evening. I am not sure if it helps to sleep better but it definitely relaxes me☺
29.10.2019 - My 2nd Passion fruit plant๐Ÿ˜

Anyway, I am grateful and happy enough to see most of my passion fruits growing well at my back yard. So I decided to plant another at the front. This time, I bought the plant from the market for a price of Rm20๐Ÿ˜…๐Ÿ˜…

Refreshing Passion Fruit Cocktail Drink
Ingredients:
pulp and juice from half of the passion fruit.
Blue water made from 6 blue pea flowers in a cup of hot boiling water & set aside to cool.
1 slice of lemon.
1 teaspoon honey
few ice cubes
Scoop the pulp and juices from the passion fruit into a glass.. Add a slice of lemon.

Add 1 teaspoon of honey (according to your sweetness)

Pour in blue pea flower water.
Give a good stir to mix well with the honey
Add ice cubes
Healthy Fresh passion fruit drink and it's free because the fruits came from my garden! 

I had this exotic tropical fruit drink at Kenny Rogers Roasters. It's called Triple Passion, an amazing trio of Guava, Passion fruit and Mango at Rm 10.50 per glass!

Well, ladies and gentlemen, if you can get any passion fruits, try and make these. They are really yummy yam yam! If you did, do post me your comments. ok?๐Ÿ˜„
Look at my grand nieces, enjoyed plucking and picking up ripen passion fruits ๐Ÿ˜‚

This enjoyable outdoor activities will be remembered by them forever ☺

Wednesday, 21 August 2019

My teenie tiny fish pond


When I was working in Brunei in 1996,there was a fish pond outside my work place. In the evening, when the sun set, it was lovely to stand outside the compound feeding the little fish and watching them coming up to get their food.

 In 2019, after my little garden was created, I decided to make a small fish pond.

In the evening, when the sun set, the atmosphere gets cooler and it was lovely to sit outside my garden with a good cup of tea, while watching my little pond with its inmates swimming gracefully, to enjoy the evening
Tiny DIY fish pond๐Ÿ˜

Items for a 32inches X 14 inches shallow fish pond: 


Blue canvas sheet 32 “ x  45”
Orange bricks X 10 pieces for the inside layout

Orange bricks X 12 pieces for the outer layout
1 pail of water (preferable rain water)
water filter pump less than Rm5

 A few white stones for decoration Rm3.50 a container bought from stone shop
A few pots of indoor plants and some wild hyacinth plants ( from my garden)

Method:

1.   Lay the 10 pieces of bricks and arrange them as shown in the picture below.


2. Place the 32" X 45 " blue canvas over the brick and neatly created a space for water to be filled in later.


3. Place the remaining 12 bricks for the outer layer to secure the canvas. Once water is filled into the space it will automatically secure the canvas. You have an option whether you want to trim off the excess blue canvas. I just leave as it is and you can add white pebbles to make it look more beautiful and at the same time covering the  excess blue canvas.


4. Add water. Preferably rain water because tap water contains chlorine. If there is no rain water, you can use tap water. Leave over night in a bucket or add anti chlorine solution for fish tank will help.
5. Position the pump and add in the white stones and  indoor plants.
6. Leave the water in the pond for at least 24 hours
7. The next day when the fishes are ready , leave the fish inthe bag floating in the water for at least 30 mins for fish to adjust to water temperature in the pond


When my fish pond was completed, I put some indoor plants,given to me by
 my friends to make it look pretty. They do look good around the pond๐Ÿ˜Š๐Ÿ˜Š๐Ÿ˜‰๐Ÿ˜‰
The 7 little fishes were still alive, actually they have reproduced!!

"


In August 2019, the 20th, I began to notice there were little tiny baby fishes in my little pond. My little fishes multiplied!!!๐Ÿ˜๐Ÿ˜๐Ÿ˜


It's exciting to see tiny little baby fish, swimming in the pond.๐Ÿ˜

In 2020, I had to return to Singapore, so I transferred all the fish into the fish tank and dismantled the tiny fish pond. Since then, it was forgotten in my mind. 
Suddenly, in 2026, I decided to rebuild it again to amuse my 6 yrs old grandson ๐Ÿ˜ .
 
This time, I added a solar water pump which could create an outdoor water fountain and waterfall to make the little pond looks cute and more attractive.๐Ÿคญ 

Saturday, 17 August 2019

A paddy field within our city

One fine day, in August 2019, I was using a new route for the first time to the airport. It is the "Bongoong Kodundungan Ganang road" . On the way, I came upon a beautiful paddy field that caught my eye. This field had been there all along, yet I never knew about it. It was the second batch of planting of the year. One of the farmers told me, they plant the rice twice a year and harvest in April/May and end of November.
I googled to learn more about this paddy field. According to the Borneo Post news in 2015, the ex District Officer, Luvita Koisun had  to put up with criticisms from those who didn't support or understand her reasons for wanting the paddy fields to remain as they were.  
Thanks to her, at least we can now witness a paddy field right in the middle of our city, just 5 minutes drive from the airport.
On the 25th September 2016, the area Kodundungan was declared a Paddy Conservation area. Phew๐Ÿ˜…! At least the area would not be converted into high buildings with shopping malls or condominium! That would spoil the nature's beauty.
I have visited many countries before and I have never seen any paddy fields within the cities, including Thailand. You need to go further from the city into the interior or remote places to see one while in Singapore, you can't even find one at all .๐Ÿ˜‚๐Ÿ˜‚๐Ÿ˜‚

I salute those villagers who still kept their fields and preserve them.
When I was a child, my parents' house was facing a Paddy field, Kg Ganang Kepayan.
 Now that field has become a housing estate. How sad๐Ÿ˜ข. We must encourage those who still have their paddy fields that it is important they remain as they are, especially the city area. 

Not only paddy helps to feed our country as its our staple food but for the tourist, the sight of a paddy field has a beautiful panoramic view. The sight is as equally beautiful as the lakes and snow-capped mountains in Scotland. It's a breath taking view.

View of the rice field from the road side near a big shopping mall at Penampang

The above is one of the most beautiful Paddy field views at Kampung Kodundungan. The wind blowing the paddy, swaying in the field has a calming relaxing effect on me๐Ÿ˜Š.

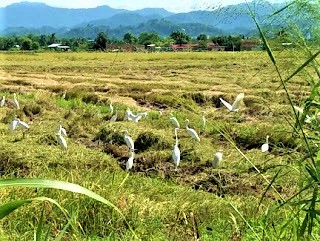
Every 31st May is a harvest festival day which the native Kadazan dusun celebrate as thanksgiving to the rice gods after harvest and egrets will be flying about the fields, looking for left over paddy. 
Years ago the buffalos (kerbau) used to plough the fields but now due to high tech, they are replaced by machines.


A short video of the Paddy swaying when the wind was blowing๐Ÿ˜Š

 A short video of  the rice field at sunrise early in the morning, along the Bongoong Kodundungan Ganang road just 5 minutes to airport.
I was lucky to take  this video when the haze had not started yet and the sky was so clear and blue.
Road passing by a rice field early in the morning before sun rise.

Every morning, when the sun comes out, the paddy field is still a good sight to view ,even on cloudy day.

The 4 pictures below were taken within a minute difference when the sun was coming out in the morning in August 2019. How fast the views change when the sun came out, shining on the rice fields


 This time of the month was when the paddy plants were going to produce rice soon.

It's 17th Sept 2019 - Haze from Kalimantan started to spread to this area too. It covered the sun at 11am in the morning, spoiling the morning fresh air. Haizzz....How sad๐Ÿ˜ฅ!
Paddy beginning to show in the fields๐Ÿ˜ƒ๐Ÿ˜ƒ๐Ÿ’ช
At this time, the farmers put out pieces of cloth or plastic to chase the birds away which were feeding on the paddy before harvest.
Scarecrows were set up to scare birds away from the field where the rice are growing.

18.9.2019
The haze spoiled the beautiful view of the rice field but it didn't stop me from visiting often๐Ÿ˜œ
Nature is wonderful - the egrets, the green paddy field and the hills๐Ÿ’“
Look at the Egrets! Eying at the rice field๐Ÿ˜

Egret taking flight 


 It's lovely to watch the egrets flying so freely and gracefully


 machine to harvest the paddy.

Paddy collected to be transported to factory for packing .
These rice from the field are grown, packed and sold only for the local consumers.
Egrets all over the fields, taking their chances to feed on the left over Paddy after the harvest.

Lately, a friend posted me her beautiful padi field from Tambunan. It was so beautiful that I couldn't help not posting it here to share. 


Thank you Flora and Florida, for contributing such a lovely photo of the Padi field in Tambunan ๐Ÿ™

A simple Fried rice ( 1-2 person) using "rocket stove".


Those who had read the story I wrote about "Rocket stove" with a recipe on fried noodle will know what i mean. For those who haven't, no worries, just click "Rocket stove" and it will link you in.๐Ÿ˜Š

Ingredients:
a bowl of cooked rice (preferably a few days old to a week rice)

Diced red & yellow pepper and chopped spring onions.
Crushed garlic.
Steamed sweet corn

 
1-2 eggs beaten

cooking oil, soya sauce, pepper and salt


Method

1. Add little oil and fry the beaten egg into omelette, then sliced thinly and keep aside.


2. Heat oil in another wok, Add chopped garlic and fry till fragrant and slightly brown


3. Add the vegetable (red, yellow pepper and spring onions) and fry till cooked. 
Add prawns/sliced meat if desire. 
4. Add rice and fry for a min or two.
5. Add seasoning.
Add sliced omelette and stir fried for another min in slow fire
Garnished with chopped coriander leaves and sweet corns

Serve hot.